DOOM TEXTURE ALIGNMENTS: A TUTORIAL
This file was created using Deth version 3.92 (RISC OS port v. 1.00), but it should apply to any other Doom editor as well.
Written entirely by Martin Bazley. Every example in this manual has been tested, but please email me at martin@bazleyfamily.co.uk if you discover something wrong.
Note that I was using the Ultimate Doom when I compiled this; I don't think there are any differences between this and Doom I/II, but I'm not making any promises.
I decided to write this file because I was finding it impossible to remember how to align textures properly. I'm sure lots of other people have the same problem.
Y-alignments will be dealt with first, because they're harder.
How to vertically align textures
Vertical alignment is a bitch. I will make no secret of it - it is absolutely the hardest to achieve and hardest to remember part of any given Doom level. I hope that, in this quick manual, I will be helping many others who have the same frustrating problems as me.
Normal textures
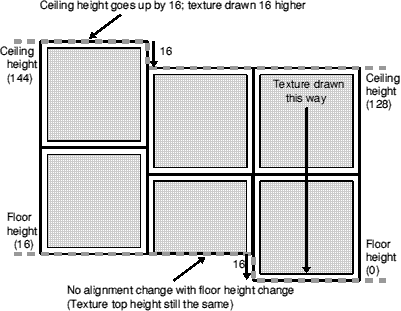
Normal textures are drawn from the top downwards. This means that the top of the texture is always aligned with the ceiling, like so:

The texture y offset works by setting which part of the texture is drawn at the top:
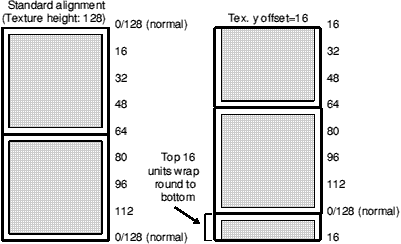
Note that you can also use negative numbers in texture alignments - e.g. '-16' is equivalent to '112'.
This is all very well in its way, but in general you'll want to leave alignments on ordinary walls alone. And as we've already seen, a normal texture behind a flight of stairs will need no alteration, as the texture is drawn from the top down and changes in floor height are ineffectual.
Changes in ceiling height, however, are another matter...
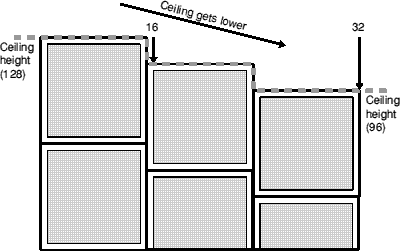
As you can see, every time the ceiling drops by 16 units, so does the texture. What we need to do is to make it ignore the top 16 units of the texture, so the rest gets drawn in the right place. Hang on, isn't that what texture y offsets are for...?
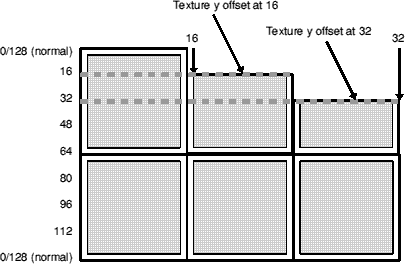
To align with drops in ceiling height, set the texture y offset to the difference between the height of the sector and the height of the texture.
e.g. if you were trying to fit a height 128 texture into a space 96 units big, you would set the texture y offset to 128-96, or 32.
Alternatively, you can use negative numbers - set the texture y offset to minus the sector height.
e.g. in the above example, you would set the texture y offset to -96.
Lower textures
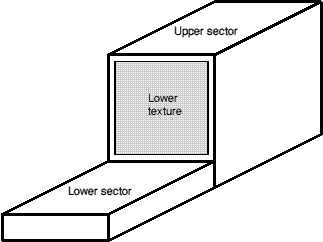
Lower textures are more complicated than normal textures in that they only apply to a part of a linedef. This means that, to calculate the y offset, you need first to calculate the height of the lower part of the sidedef. This is always the part touching the floor.
Take this rather ordinary-looking staircase:
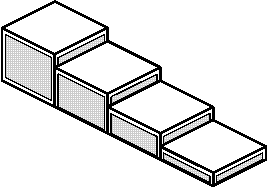
Staircases are always good for lower textures, because, as well as the steps themselves, you could have the outside to deal with as well.
We'll concentrate on the outside.

Lower textures, like normal textures, are drawn from the top downwards.
This means that the offsets, like in normal textures, run from top to bottom.
The first thing you need to do when calculating offsets is to find out how high your lower sidedef is. A lower texture is used when there are two sectors with different floor heights next to each other, so:
The height of the lower sidedef is equivalent to the floor height of the upper sector minus the floor height of the lower sector.
e.g. on a platform with floor height 96 standing on a step of height 24, the lower sidedefs (the sides of the platform) are 72 units high.
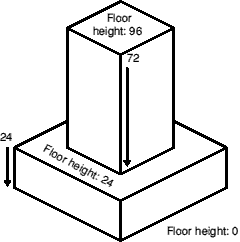
Because the lower sidedef numbers run from top to bottom like normal sidedefs, and because the upper sector floor is, in effect, the ceiling of the lower sidedef, almost exactly the same method can be used to align them properly:

To align lower textures, set the texture y offset to the difference between the upper sector floor height and the texture height.
e.g. to fit a size 128 texture onto the sides of a platform of height 72, set the texture y offset to 128-72, or 56.
Alternatively, you can use negative numbers - set the texture y offset to minus the height of the lower sidedef.
e.g. in the above example, you would set the offset to -72.
Note: all of the above assumes you want the bottom of the texture aligned with the bottom of the linedef. If you want the top of the texture aligned with the top of the linedef, you don't have to do any aligning at all!
Other note: for lower textures on the steps themselves, you'd really be better off using a STEP× texture. Otherwise, usual offset rules apply.
Yet another note: if your lower texture has another higher-than-normal sector below it, it will not be affected. (Top-down logic again.)
Upper textures
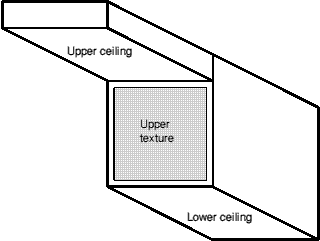
These, again, only apply to part of a linedef, in this case the part joined to the ceiling. Essentially they should work the same as lower textures. But there's an additional complication.
While normal textures and lower textures are drawn from the top down, upper textures are drawn from the bottom up.
Gaarrgh! This is such an incredibly easy trap to fall into, and such a difficulty to remember. This changes the whole state of affairs right round; now, it is the bottom edge that causes misalignments.
In other words, the upper ceiling can vary all it likes, but misalignments occur when the lower ceiling changes height.
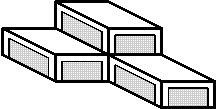
Remember those steps from the last section? Let's turn them upside down:
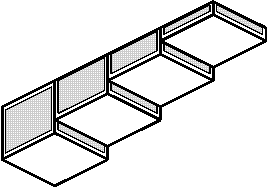
And concentrate on the outside:

It is here that Doom decides to spring another trap on us, just for the sake of complicating things further:
While upper textures are drawn from the bottom up, the texture y offset numbering still runs from top to bottom.
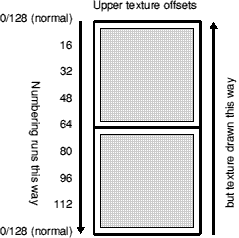
As with any other kind of sidedef, 0 counts as either the top or the bottom, but because the texture is drawn upwards, technically it is at the bottom.
However, an offset of 16 is not 16 units above the bottom, but 16 units below the top. This makes offset calculation quite different:

To align upper textures, set the texture y offset to the height of the upper sidedef.
e.g. to squash a height 128 texture onto an upper sidedef of height 32, you would set the texture y offset to 32.
Alternatively, you can use negative numbers - set the texture y offset to minus the difference between the height of the upper sidedef and the height of the texture.
e.g. in the above example, you would set the texture y offset to -96.
Other stuff
Every example in this manual assumes you are working with a floor height of 0 and a ceiling height of 128. You may have to make your own adjustments.
Also, a texture height of 128 is assumed. If your texture is smaller, you will have to adapt some of the 16 times tables that keep cropping up.
How to use unpegging when aligning textures
All this stuff about lower sidedefs and texture offsets is all very well as long as you only want to build staircases or high ceilings. But what happens when you want to use both upper and lower textures at once? Like with a window, for example?
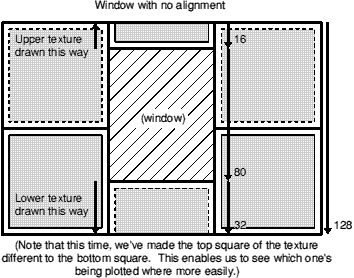
Here we see the case when the textures are left unaligned. The Doom texture drawing has evidently run its course, and the upper texture has started from the bottom up, and the lower texture has been drawn from the top down. Now to align them.
We'll start with the upper texture. The upper sidedef is 16 units high, so we'll set the texture y offset to 16.
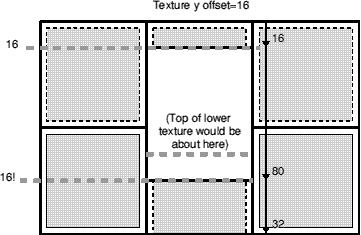
Whoops! If you're a clever sort of person, you will have already realised that:
There is only one texture y offset per sidedef, which affects normal, upper and lower textures all at once.
So it would seem that, with a scenario like this, one sidedef is always doomed to be misaligned. Not so! This is where the unpegging comes in.
The options to unpeg upper and lower textures are available in the linedef flags (note that this means they apply to both sidedefs, if you're aligning something like MIDVINE1). They are very useful for aligning windows.
An unpegged texture will be drawn the opposite way to the way it would normally be drawn.
So upper textures are drawn downwards, and lower and normal textures will be drawn upwards.
There are two unpegging flags - the first affects upper textures, and the second affects both lower and normal textures.
It should be apparent, after the last two sections, that the misalignments on both versions of our staircase were caused by the lower textures being drawn downwards (and therefore becoming misaligned with adjacent steps) and upper textures being drawn upwards. So, if we were to take, say, the staircase with lower textures, and unpeg all the lower textures...

Does it remind you of anything? Like, possibly, the exact effect we got with all the offset stuff?
Now let's try unpegging the upper and lower textures on the window.
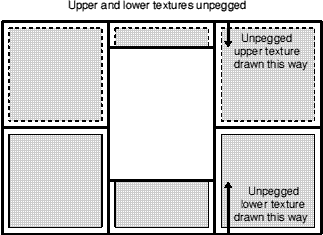
And it works!
Now, what if the alignments on the normal textures next to our window were very slightly skewed? Say, if we'd just aligned them all the way down a staircase and they didn't quite come out even? What happens if the normal textures are offset by 8, and we set the texture y offset on the window to 8 as well?
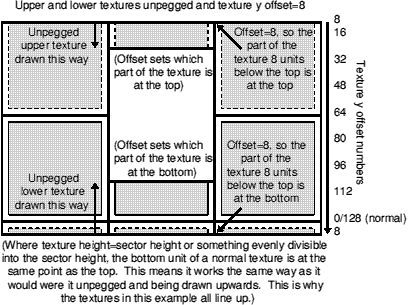
The mathmatical explanation given above looks hopelessly complicated (and is), but all you need to know is:
Setting the texture y offset on a window with unpegged upper and lower textures is exactly the same as setting the texture y offset on a normal texture.
Another useful fact about unpegging is that, on a door, the DOORTRAK textures on the sides will move vertically upwards as the door rises. Convention dictates you should unpeg the normal (lower) textures of these linedefs, so they stay where they are when you open the door.
And speaking of doors, you might have guessed that the reason upper textures are drawn the way they are by default is that, if they were drawn from the top down, they too would stay firmly in place when the door opened! You can observe this effect by unpegging a door and watching it as it opens. It works with moving floors and crushers too.
Finally, if you try to put a normal texture over an unpegged window, you can probably guess that the lower unpegging flag will make it, as it did the lower texture, be drawn from the bottom up. This is why you cannot align things like vines around a window - the lower texture just comes out as a repeat of the bottom part of the normal texture. Oh, and I don't recommend putting non-transparent normal textures on double-sided linedefs - I tried it once, and Doom generated the mother of all tutti-frutti which slowed my computer down to an exhausted crawl. However, I'm pretty sure this is merely a deficiency in RISC OS Deth/Doom, since I've definitely seen it done - principally in deathmatch WADs.
That's vertical alignment over and done with for now! Texture x offsets coming next. They're commoner, but easier.
How to horizontally align textures
Most steps on staircases are of width 32. If you had a staircase with 32-units steps along the side of a room and you had carefully vertically aligned it, you might notice something was still amiss.
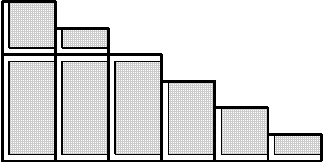
Doesn't look right, does it? This is a problem which causes lots of vertical lines to appear, so naturally it's the x-axis that's to blame.
All textures are drawn from left to right, starting at 0 (left) and finishing at anything from 8 to 256 (right), at which point they wrap round to the left again.
The starting point along this scale can be controlled by the texture x offset:
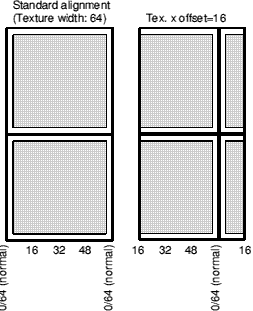
In Deth, and probably other editors as well, there is an arrow at the end of each linedef to show you which way the texture is plotted. Note that this only applies to the first sidedef!
Unless you've done something very strange, all the textures on the staircase should be plotted from left to right. The stairs are of width 32, which means that the lower texture on the outside of each step is 32 units wide - not good for a 64-wide texture!
You need to alter the texture x offsets, like so:
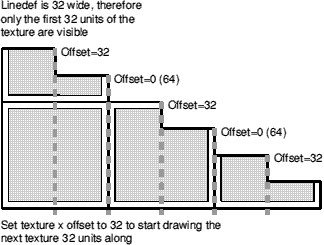
Of course, that was a nice simple example. Let's imagine a long linedef, which, for whatever reason you like, has been randomly split into lots of smaller ones:
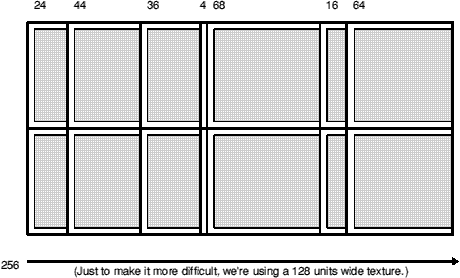
You don't need to do anything to the first one, so we'll leave that offset at 0. Next, you need to find out the length of the first linedef, which in this case is 24. Because only the first 24 units of this texture are visible, the texture x offset for the next one should be 24 to start drawing it 24 units along:
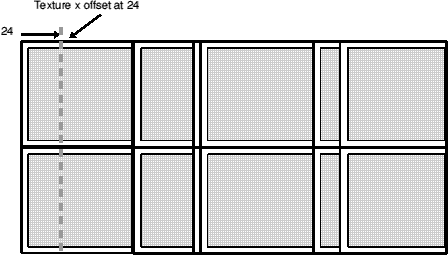
Now, how long is the next one? 44 units. And we've just put a texture x offset of 24 units on it, meaning that by the end of the next linedef, the offset will have reached 24+44 units, or 68 units.
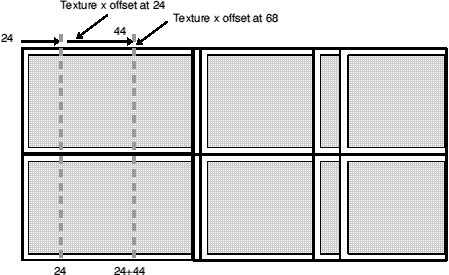
To horizontally align textures, set the texture x offset to the previous offset plus the length of the previous linedef.
Lather, rinse, repeat:
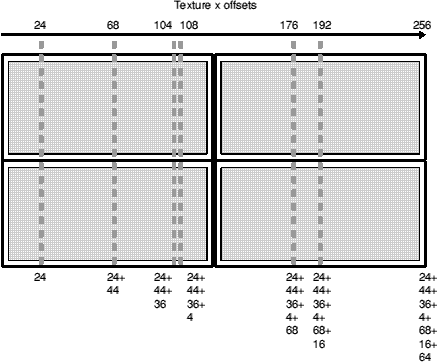
You might have noticed that, while the texture is 128 units wide, some offsets go beyond that amount. This will work perfectly, but you can do it a bit more tidily.
Because a texture x offset that goes beyond the width of the texture effectively wraps round to the left-hand edge again, the offset is the same as it would be 128 units (or your texture width) ago. This means that a texture offset of 176 (as in the above example) is exactly the same as an offset of 48.
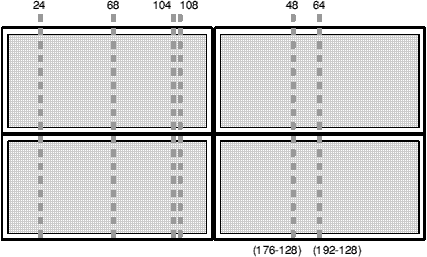
For texture x offsets greater than the width of the texture, subtract the texture width until you get a number smaller than the texture width.
How to align floor and ceiling textures
Floor and ceiling textures are automatically aligned to the 64-unit grid.
Er, that's it.
Martin Bazley 3/6/07